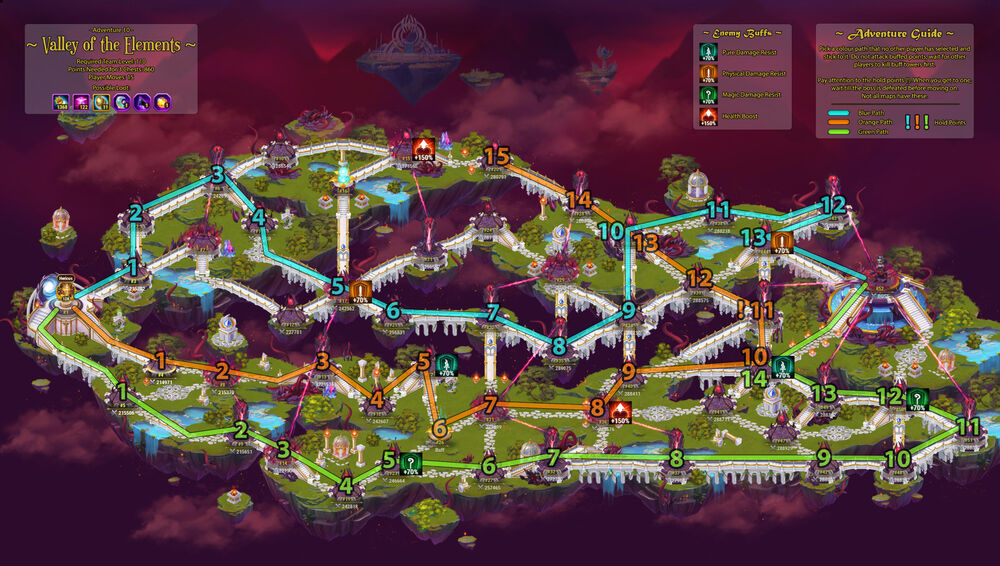
Adventure 1
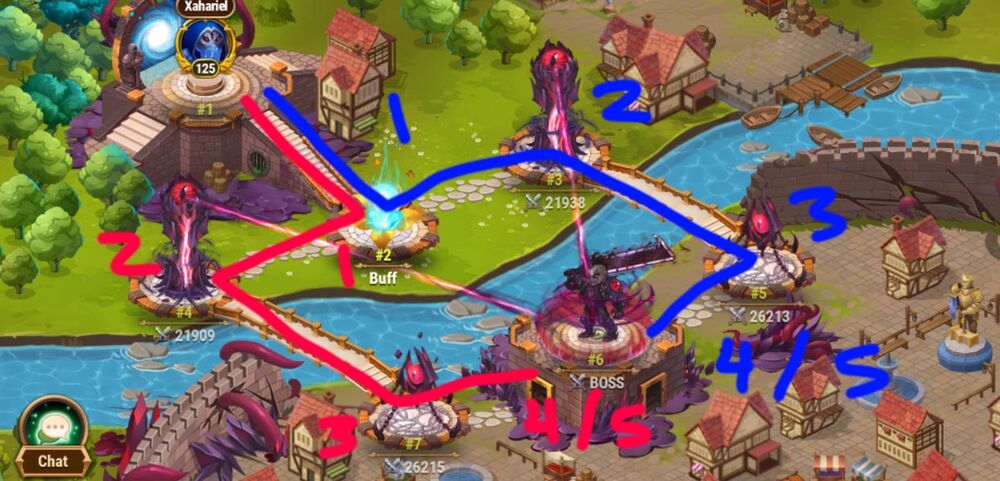
| Player | Move #1 | #2 | #3 | #4 | #5 |
|---|---|---|---|---|---|
| 1 | 2 | 3 | 5 | 6 (boss) | |
| 2 | 2 | 4 | 7 | 6 (boss) | |
| 3 | 2 |
Adventure 2
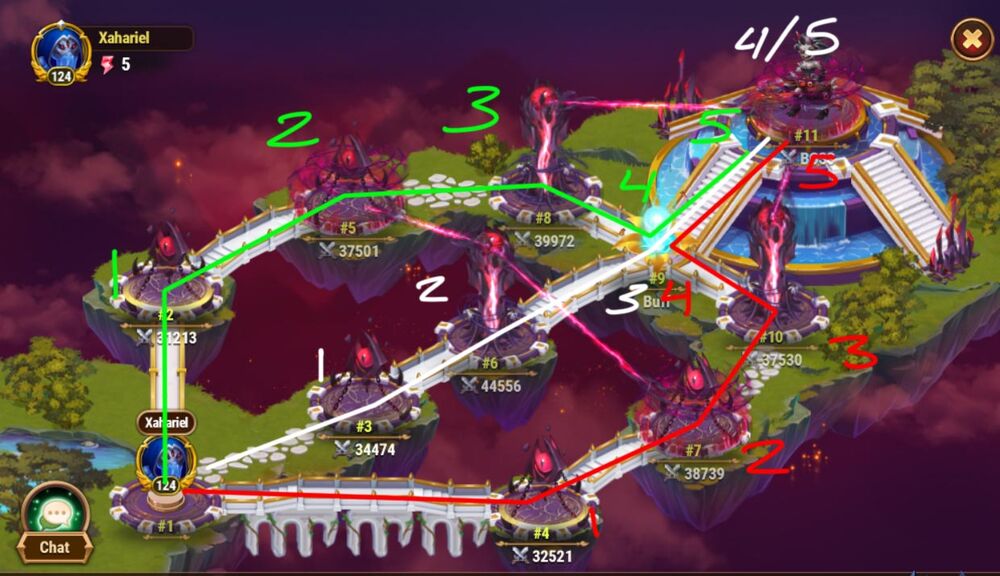
| Player | Move #1 | #2 | #3 | #4 | #5 |
|---|---|---|---|---|---|
| 1 | 3 | 6 | 9 | 11(boss) | |
| 2 | 2 | 5 | 8 | 9 | |
| 3 | 4 | 7 | 10 | 9 |
Adventure 3
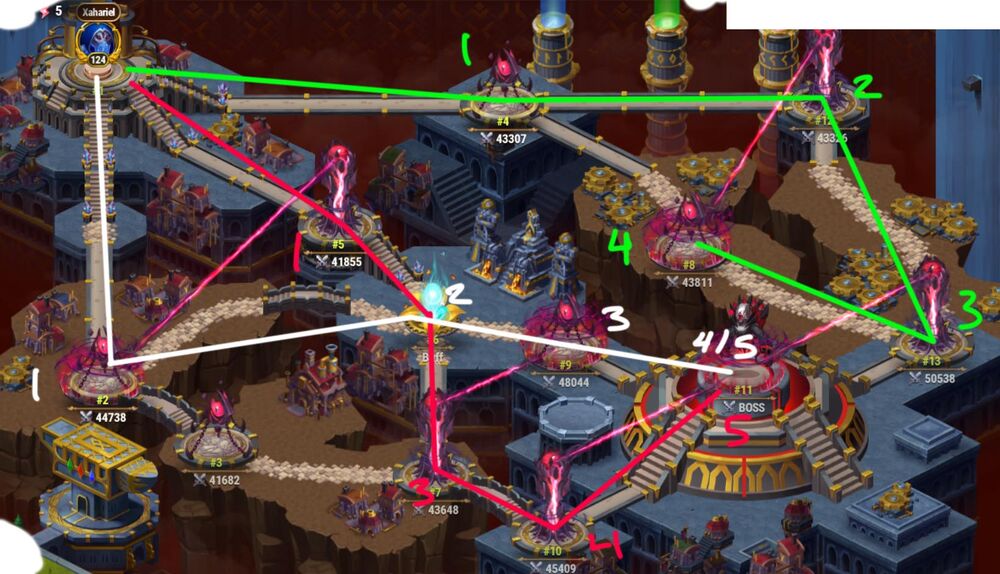
| Player | Move #1 | #2 | #3 | #4 | #5 |
|---|---|---|---|---|---|
| 1 | 5 | 6 | 7 | 10 | |
| 2 | 4 | 12 | 13 | 8 | |
| 3 | 2 | 6 | 9 | 11 (boss) |
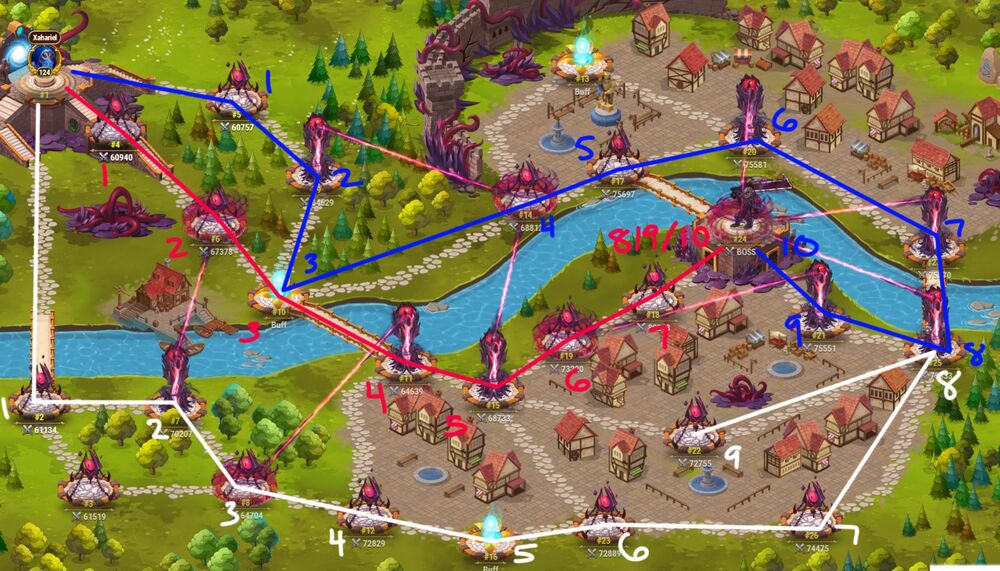
Adventure 4
 Back to Adventure list
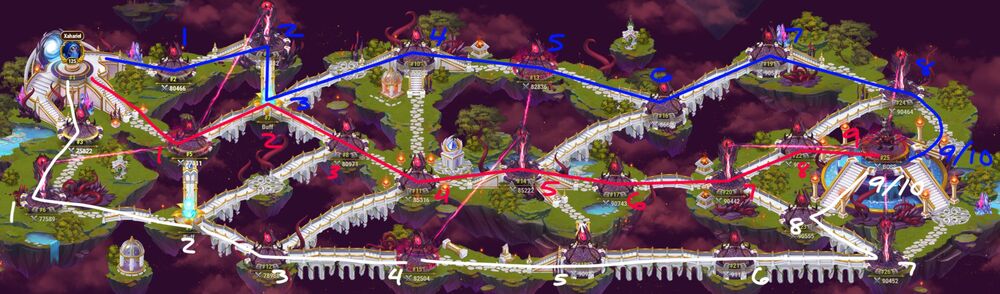
| Player | Move #1 | #2 | #3 | #4 | #5 | #6 | #7 | #8 | #9 | #10 |
|---|---|---|---|---|---|---|---|---|---|---|
| 1 (red) | 2 | 4 | 7 | 18 | 8 | 12 | 13 | 20 | 22 | 23 (boss) |
| 2 (blue) | 5 | 24 | 25 | 9 | 14 | 13 | 12 | 19 | 22 | 23 (boss) |
| 3 (white) | 3 | 6 | 11 | 17 | 10 | 16 | 21 | 22 | 23 (boss) | 23 (boss) |
Adventure 5
 Back to Adventure list
| Player | Move #1 | #2 | #3 | #4 | #5 | #6 | #7 | #8 | #9 | #10 |
|---|---|---|---|---|---|---|---|---|---|---|
| 1 (white) | 2 | 7 | 8 | 12 | 16 | 23 | 26 | 25 | 22 | |
| 2 (red) | 4 | 6 | 10 | 11 | 15 | 19 | 18 | 24 (boss) | 24 (boss) | 24 (boss) |
| 3 (blue) | 5 | 9 | 10 | 14 | 17 | 20 | 27 | 25 | 21 | 24 (boss) |
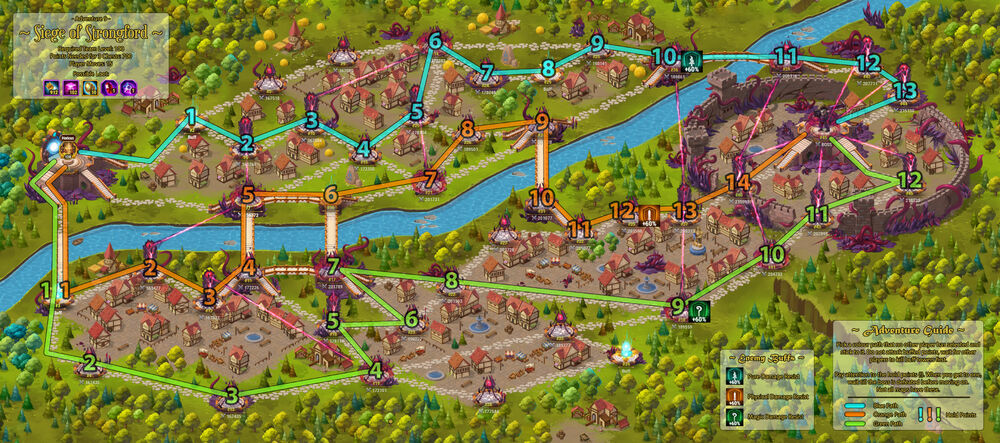
Adventure 6
 Back to Adventure list
| Player | Move #1 | #2 | #3 | #4 | #5 | #6 | #7 | #8 | #9 | #10 |
|---|---|---|---|---|---|---|---|---|---|---|
| 1 (white) | 3 | 6 | 9 | 12 | 15 | 18 | 21 | 26 | 23 | 25 (boss) |
| 2 (red) | 5 | 7 | 8 | 11 | 14 | 17 | 20 | 22 | 25 (boss) | 25 (boss) |
| 3 (blue) | 2 | 4 | 7 | 10 | 13 | 16 | 19 | 24 | 25 (boss) | 25 (boss) |
Adventure 7
 Back to Adventure list
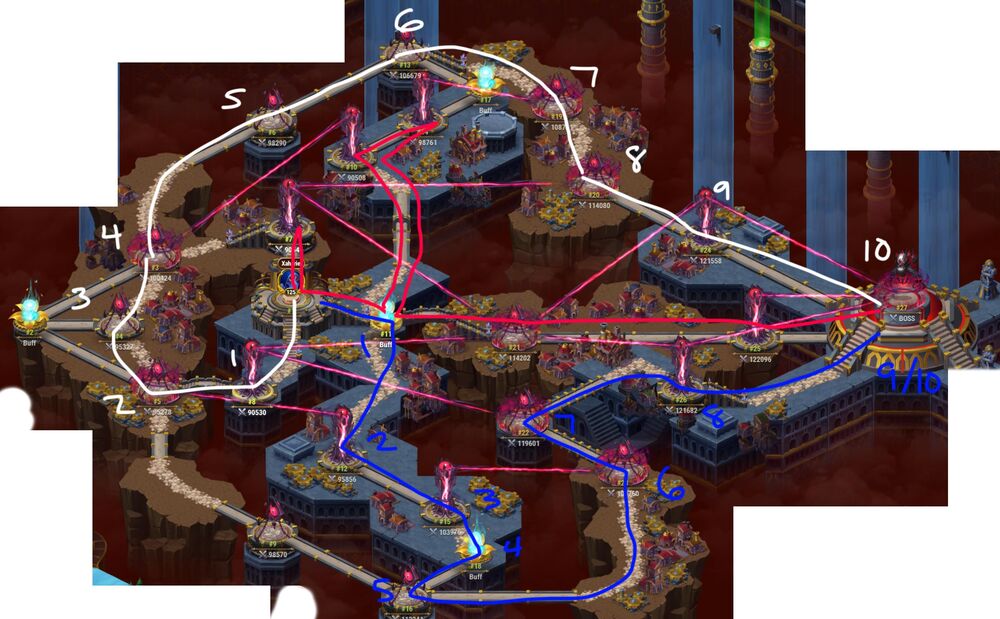
| Player | Move #1 | #2 | #3 | #4 | #5 | #6 | #7 | #8 | #9 | #10 |
|---|---|---|---|---|---|---|---|---|---|---|
| 1 (blue) | 11 | 12 | 15 | 18 | 16 | 23 | 22 | 26 | 27 (boss) | 27 (boss) |
| 2 (red) | 7 | 1 | 11 | 10 | 14 | 10 | 11 | 21 | 25 | 27 (boss) |
| 3 (white) | 8 | 5 | 4 | 3 | 6 | 13 | 19 | 20 | 24 | 27 (boss) |
Level 80 teams.
NOTE YOU CAN ONLY LEAVE ONE POSITION OUT.
Version 1 (Ducklings) Position omitted is 9.
Player 1 :- 7, 1, 11,10,14, 10,11, 21, 25, BOSS (boring route but necessary as it takes out beacons on
7,10 & 14.)
Player 2 :- (Note no buffs for this player) 8, 5, (Dont go for the Buff on 2) 4, 3, 6,13, (don't go for
the Buff on 17) 19, 20, 24, BOSS
Player 3:- 11, 12, 15, 18, 16, (you don't need 9) 23, 22, 26, BOSS, BOSS
Have done this a dozen times. Player 2 gets a raw deal and needs to be strong to ensure all positions
are taken including the last. Can afford only one slip, and lose a chance at the boss, but player 3 has
several chances.
Version 2 (Goslings) Position omitted is 15.
Player 1 :- 11,10,14, 10,11, 12, 11, 21, 25, BOSS ( still a boring route)
Player 2 :- (Note still no buffs for this player) 7, 3, 6,13, (don't go for the Buff on 17) 19, 20, 24,
BOSS, BOSS, BOSS If you go for either buff you lose two attacks your choice.
Player 3:- (No Buffs for this Player) 1, 8, 5, 4, 5, 9, 16, 23, 22, 26, BOSS.
Two players with no Buffs but 5 goes at Boss.
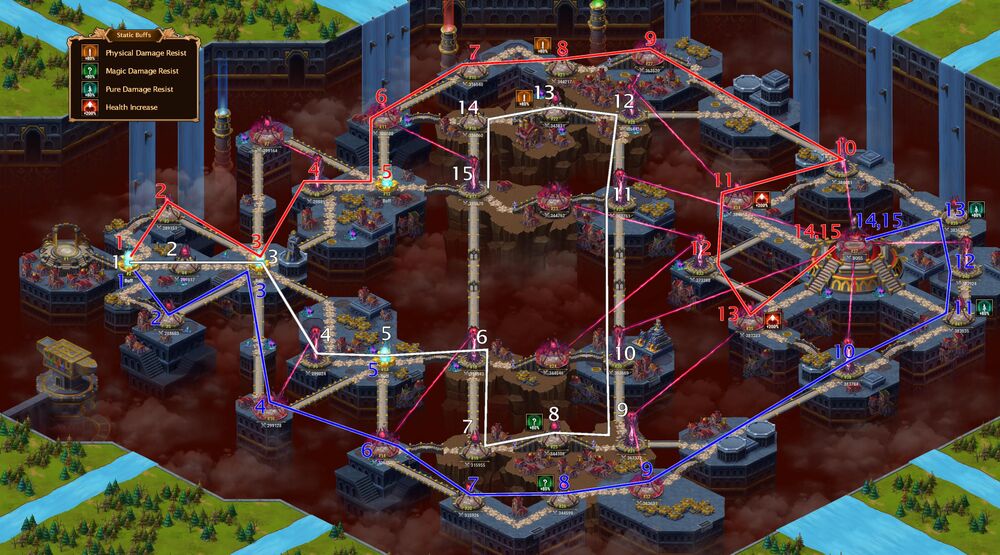
Adventure 8
 Back to Adventure list
| Player | #1 (red) | #2 (white) | #3 (blue) |
|---|---|---|---|
| Move #1 | 3 | 3 | 3 |
| Move #2 | 2 | 5 | 4 |
| Move #3 | 6 | 7 | 8 |
| Move #4 | 7 | 9 | 7 |
| Move #5 | 9 | 11 | 9 |
| Move #6 | 10 | 14 | 11 |
| Move #7 | 13 | 18 | 15 |
| Move #8 | 17 | 20 | 19 |
| Move #9 | 16 | 22 | 20 |
| Move #10 | 12 | 24 | 22 |
| Move #11 | 16 | 25 | 23 |
| Move #12 | 20 | 29 | 31 |
| Move #13 | 22 | 26 | 30 |
| Move #14 | 21 | 32 (boss) | 27 |
| Move #15 | 28 | 32 (boss) |
Level 90 teams, I would say level 95.
NOTE YOU CAN LEAVE ONE POSITION OUT.
Leave out position 12.
Version 1 (there really only is one version with variations at the end. )
Player 1:- 3, 2, 6, 7, 9, 10, 13, 17, 16, (don't take 12 a waste of 2 moves) 20, 22, 21, 28, BOSS,
BOSS.
Player 2:- 3, 4, 8, 7, 9, 11, 15, 19, 20, 22, 23, 31, BOSS, BOSS, BOSS.
Player 3:- 3, 5, 7, 9, 11, 14, 18, 20, 22, 24, 27, 30, 26, 29, 25. (SORRY no boss.)
It is useful in this one to meet at 20 and decide the final portion. There are variations that involve
player 1 or player 2 having to fall back to take positions in the centre. Player 2 could go 23, back to
22, 24, 25, 29. and no go at the boss. BUT all the variations involve doubling back and that is
inefficient and wastes attacks on the BOSS. It is wise for players 1 and 2 to wait at 21 and 23 until
player 3 takes all positions as one can double back to take either 1 (player 1), 2 (player 2) if Player
3 should lose a battle or two. Both have several shots at the boss and if they can take in one (player 1
(2 for player 2)) can still take the last position on the other side.
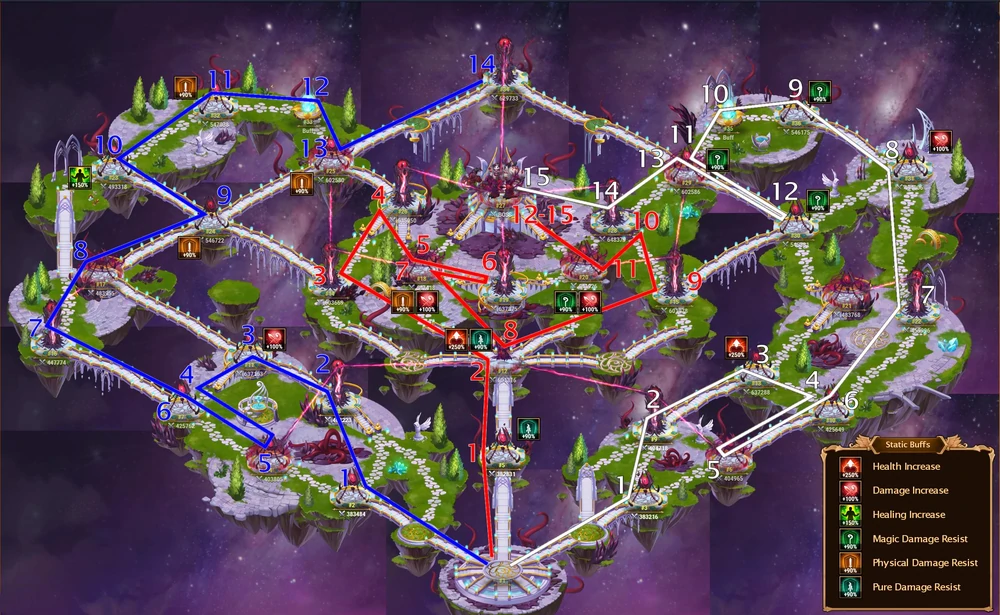
Adventure 9
 Back to Adventure list
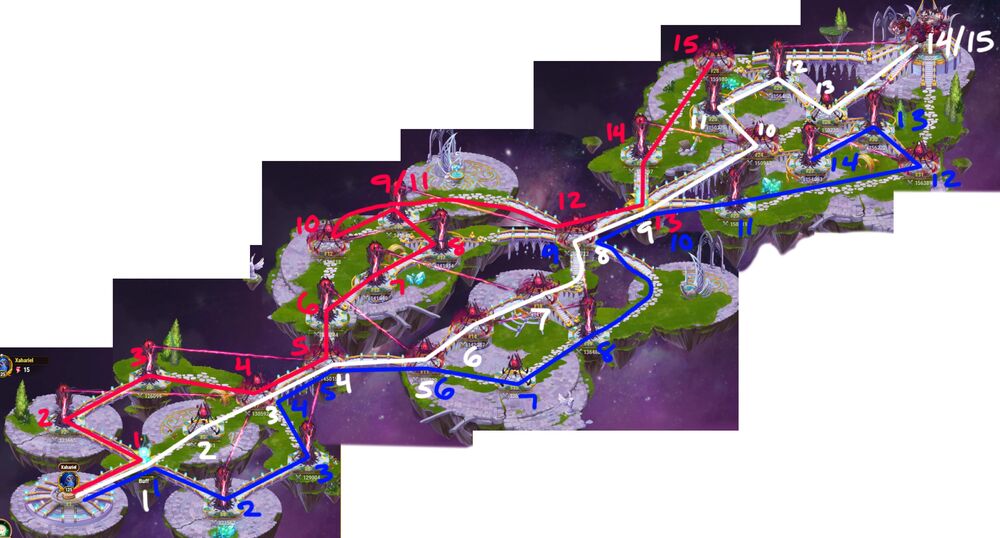
| Player | #1 (blue) | #2 (orange) | #3 (green) |
|---|---|---|---|
| Move #1 | 2 | 3 | 3 |
| Move #2 | 6 | 8 | 4 |
| Move #3 | 10 | 12 | 13 |
| Move #4 | 15 | 11 | 19 |
| Move #5 | 20 | 17 | 18 |
| Move #6 | 14 | 16 | 23 |
| Move #7 | 24 | 21 | 17 |
| Move #8 | 29 | 26 | 22 |
| Move #9 | 25 | 30 | 38 |
| Move #10 | 36 | 31 | 41 |
| Move #11 | 39 | 32 | 43 |
| Move #12 | 42 | 35 | 46 |
| Move #13 | 44 | 37 | 45 (boss) |
| Move #14 | 45 (boss) | 40 | 45 (boss) |
| Move #15 | 45 (boss) | 45 (boss) | 45 (boss) |
Level 100 teams I would say Level 110 min!
15 moves 700 to score. You can leave 5 positions untaken.
Player 1:- 2 buff, 6, 10, 15, 20, 14, 24, 29 buff, 25, 36, 39, 42, 44, BOSS, BOSS score 220
Player 2:- 3 buff, 8, 12, 11,7,16, buff, 21, 26, 30,31, 32, 35, 37, 40, BOSS score 240
Player 3:- 3 buff, 4, 13, 19, 18, 23, 17 easy to overlook this one!!, 22, 38, 41, 43, 46, BOSS BOSS BOSS
SCORE 220
THE BOSS IS 20 so 700.
Above should give everyone a buff and max hits on the Boss. There is no moving back and then forward so
is efficient.
WARNING this Adventure is hard to win Kaspar lost an attack I lost 2. My level is 111 and all abilities
111 and Max elements on 4 heros, Heros at 6 star etc etc. Don't try this level unless you have a very
strong team.
UNLESS YOU HAVE A HERO TEAM THAT IS VERY STRONG AVOID.
T1:- 2 ,6, 10, 15, 20, 14, 24, 29, 25, 36, 39, 42, 44, B, B.
T2:- 3, 8, 12, 11, 7 across the bridge, 16, 21, 26, 30,31, 32, 35, 37, 40, B
T3:-3, 4, 13, 19, 18, 23, 17, 22, 38, 41, 43, 46, B, B, B.
Adventure 10
| Player | #1 (Blue) | #2 (orange) | #3 (green) |
|---|---|---|---|
| Move #1 | 3 | 4 | 5 |
| Move #2 | 2 | 8 | 9 |
| Move #3 | 6 | 13 | 14 |
| Move #4 | 11 | 18 | 19 |
| Move #5 | 17 | 22 | 23 |
| Move #6 | 25 | 26 | 27 |
| Move #7 | 30 | 31 | 32 |
| Move #8 | 35 | 36 | 37 |
| Move #9 | 34 | 40 | 42 |
| Move #10 | 33 | 46 | 48 |
| Move #11 | 38 | 45 | 51 |
| Move #12 | 43 | 39 | 50 |
| Move #13 | 44 | 33 | 49 |
| Move #14 | 52 (boss) | 28 | 46 |
| Move #15 | 52 (boss) | 20 | 52 (boss) |
Probably need hero teams around 350,000 plus one much stronger to take the boss in 1.
T1:- 4, 8, 13, 18, 22, 26 buff, 31, 36, 40, 46, 45, 39, 33, 28, 20.
Only 260 points because of Buffs and crosing path with T3.
T2:- 5, 9, 14, 19, 23, 27, 32, 37, 42, 48, 51, 50, 49, (wait at 49 to see if T3 takes Boss in one. If
not proceed to Boss) 47 41,
300 points (only if boss is taken in one.)
T3:- 3, 2, 6, 11, 17, 25, 30, 35 delay until T1 clears beacon on 29, 29, 34, 33, 38, 43, 44, Boss.
300 points.
I cannot think of a way of removing the cross over. No room for error in this game.
Tough as you can get, Don't waste portals on this unless your team is say 350,000 or more.
Adventure 11
 Back to Adventure list
| Player | #1 (white) | #2 (blue) | #3 (red) |
|---|---|---|---|
| Move #1 | 2 | 2 | 2 |
| Move #2 | 3 | 5 | 4 |
| Move #3 | 6 | 6 | 6 |
| Move #4 | 9 | 10 | 8 |
| Move #5 | 13 | 13 | 12 |
| Move #6 | 18 | 14 | 11 |
| Move #7 | 19 | 20 | 15 |
| Move #8 | 25 | 26 | 21 |
| Move #9 | 31 | 32 | 27 |
| Move #10 | 30 | 38 | 36 |
| Move #11 | 29 | 41 | 34 |
| Move #12 | 28 | 40 | 33 |
| Move #13 | 22 | 39 | 35 |
| Move #14 | 16 | (boss) | (boss) |
| Move #15 | 17 | (boss) | (boss) |
Pets 11 Route/ Tested and working, with no buff squads
T1 - 2, 3, 6, 7, 12, 11, 15, 21, 27, 36, 39, 40, 41, BOSS, BOSS
T2 - 2, 4, 6, 8, 12, 17, 18, 19, 25, 31, 30, 29, 28, 22, 16
T3 - 2, 5, 6, 9, 13, 14, 20, 26, 32, 38, 35, 33, 34, BOSS, BOSS
Adventure 12
 Back to Adventure list
| Player | #1 (White) | #2 (Blue) | #3 (Red) |
|---|---|---|---|
| Move #1 | 3 | 2 | 5 |
| Move #2 | 9 | 8 | 12 |
| Move #3 | 13 | 11 | 14 |
| Move #4 | 10 | 7 | 26 |
| Move #5 | 6 | 4 | 18 |
| Move #6 | 10 | 7 | 19 |
| Move #7 | 22 | 16 | 18 |
| Move #8 | 31 | 17 | 12 |
| Move #9 | 36 | 24 | 15 |
| Move #10 | 35 | 23 | 28 |
| Move #11 | 29 | 32 | 20 |
| Move #12 | 30 | 33 | (boss) |
| Move #13 | 29 | 25 | (boss) |
| Move #14 | 28 | 34 | (boss) |
| Move #15 | (boss) | (boss) |